DTC Blog — Detroit Training Center

Jordan Harris

Unlocking the Power of Your Toolbox: Essential Power Tools for Home Renovation

Home renovations can be exciting, but they can also feel overwhelming—especially if you’re not confident with your tools. Thankfully, the right power tools can transform daunting projects into manageable tasks, helping homeowners save both time and money. If you’re ready to tackle your next home renovation project with confidence, mastering the essential power tools is key. Here’s a closer look at the tools you need and how to make the most of them.

Why Power Tools Are Essential for Home Renovation

Power tools are game-changers in home renovation. Unlike manual tools, they provide speed, efficiency, and precision, allowing you to complete tasks faster and with less effort. Investing time to learn how to use these tools can significantly reduce labor costs and minimize project delays. Plus, the skills you gain can be applied to future projects, saving you even more in the long run.

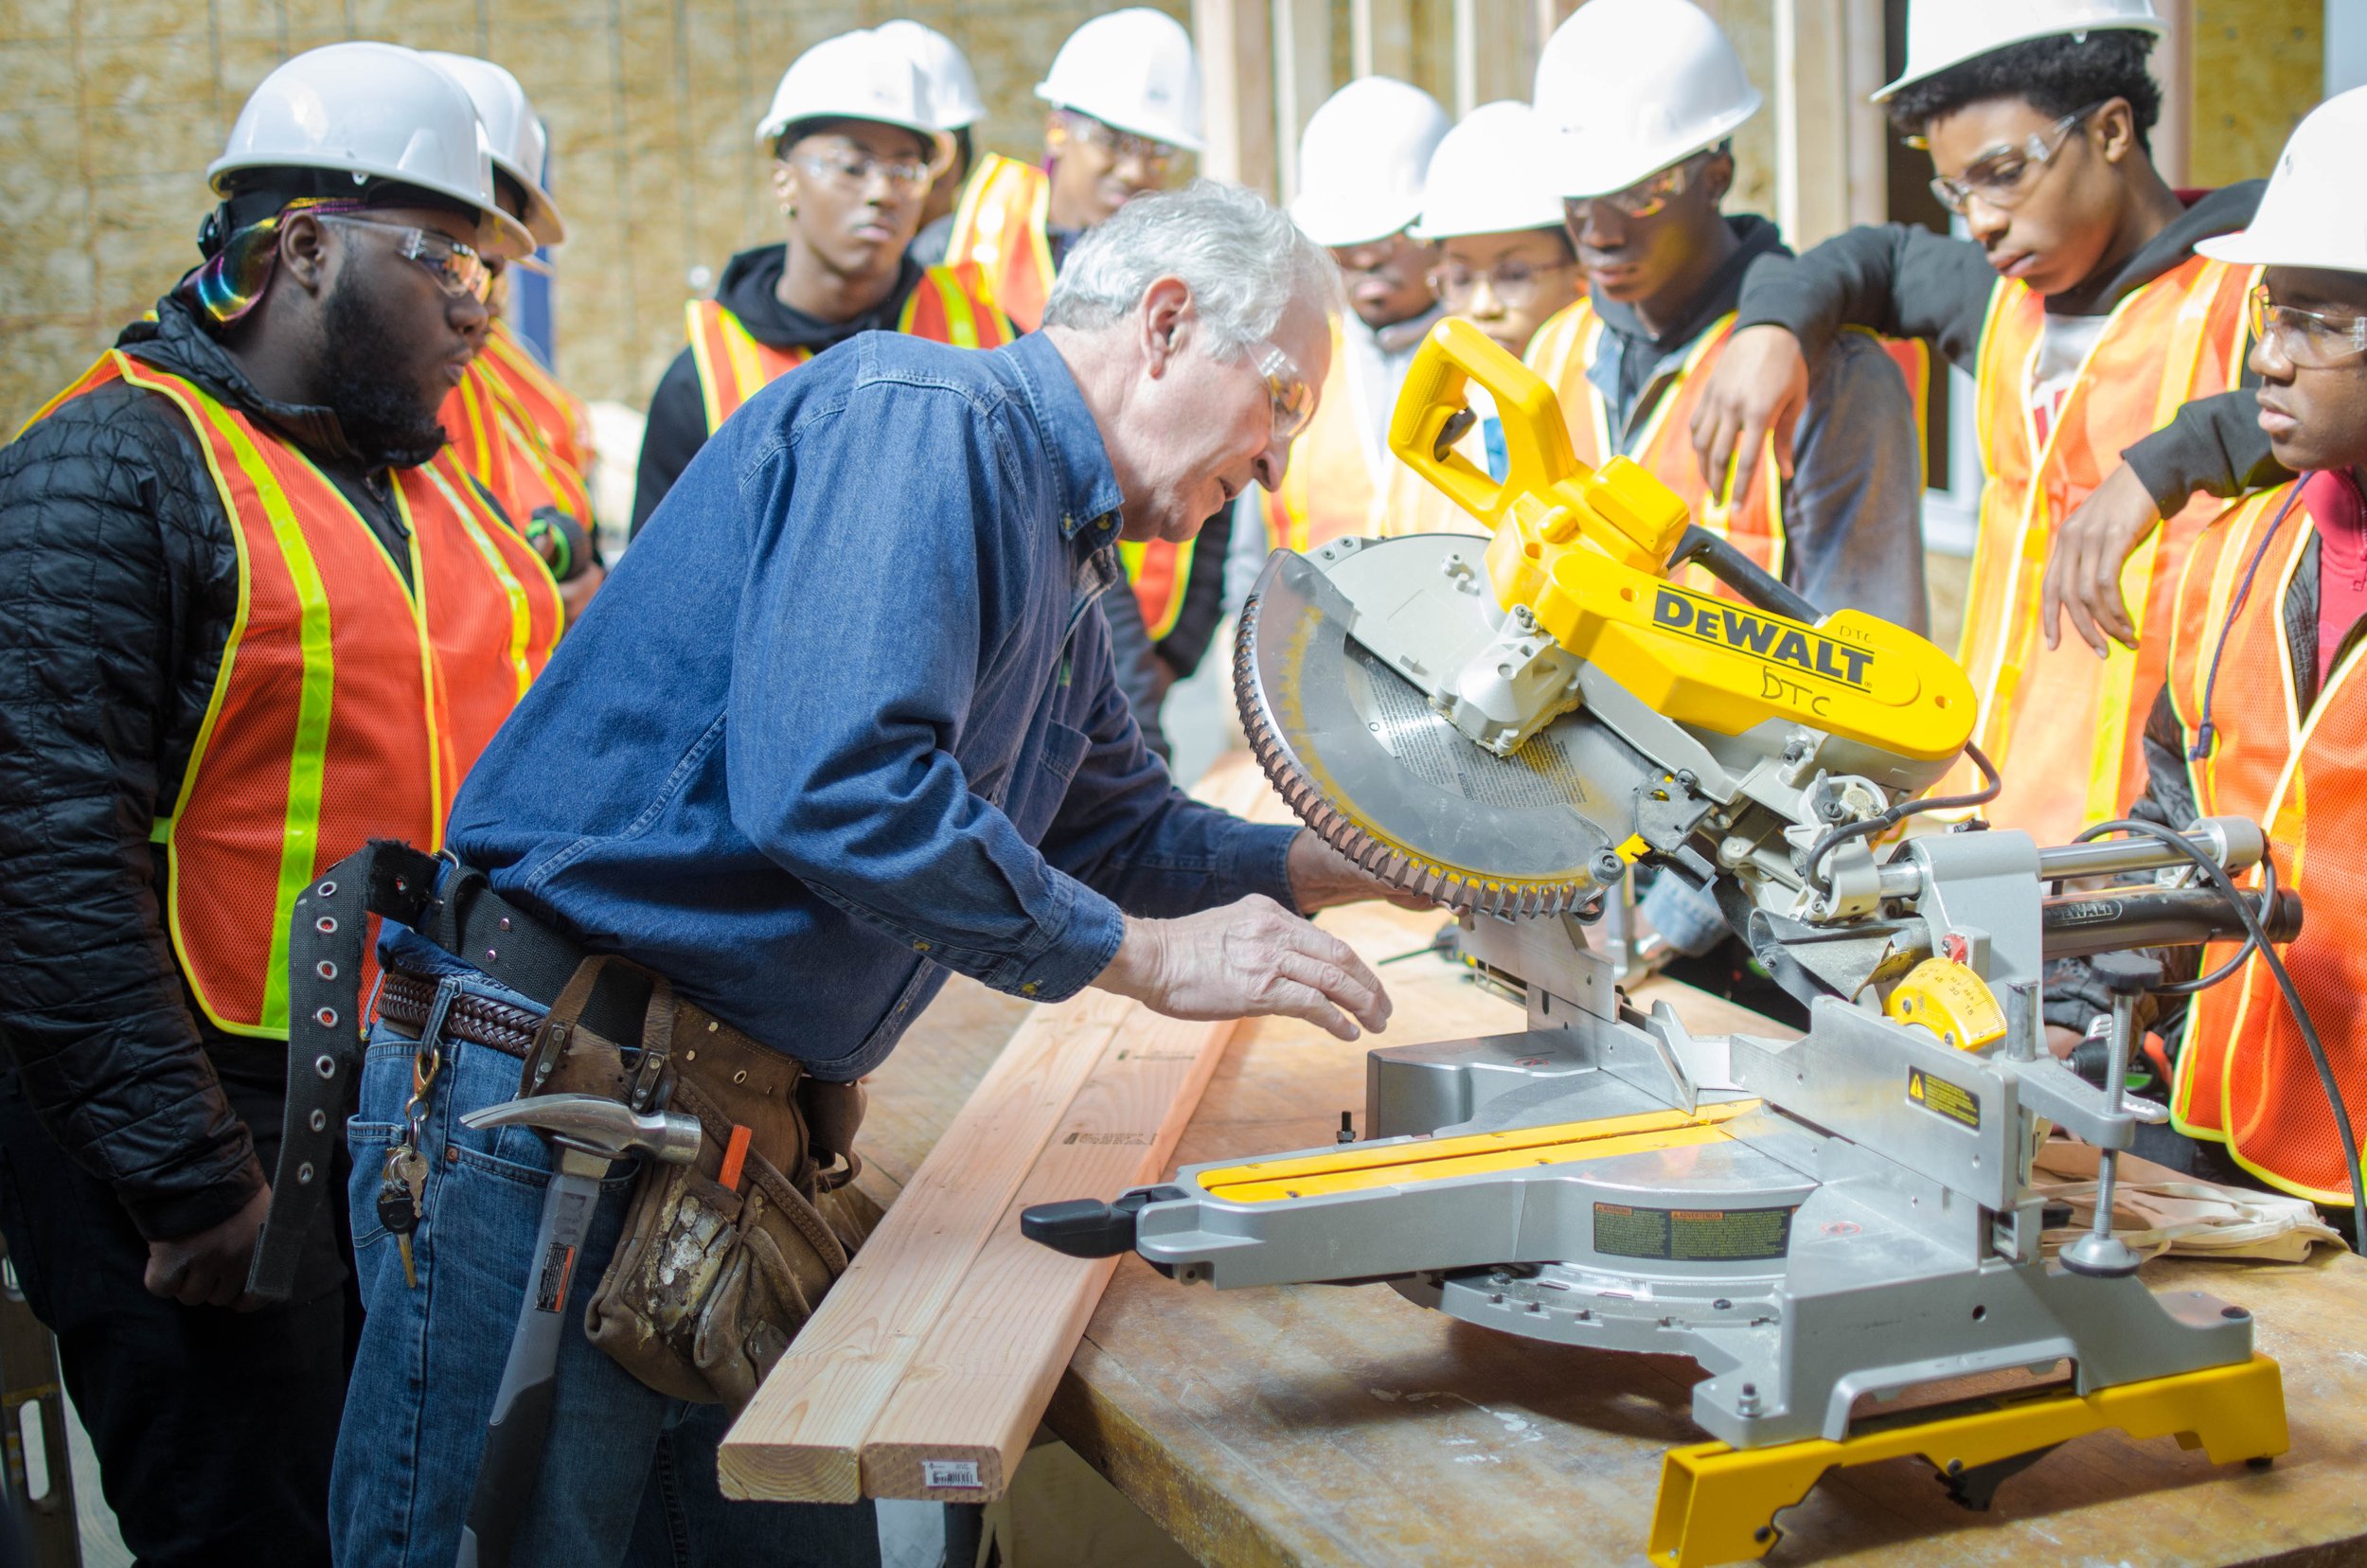
At Detroit Training Center (DTC), our Saturday workshops teach homeowners how to effectively use power tools for various renovation tasks, empowering participants to take control of their projects. Whether it’s learning how to operate a miter saw for precise cuts or mastering a power drill for seamless installations, our classes ensure you’re prepared to handle whatever your home throws your way.

Must-Have Power Tools for Home Renovation

Let’s dive into some of the essential power tools covered in DTC’s workshops. These tools are not only versatile but also readily available at retailers like Lowe’s, making them accessible for both beginners and seasoned DIYers.

  1. Power Drill and Driver

    • Why It’s Essential: A power drill is a versatile tool for drilling holes and driving screws into various materials such as wood, metal, and drywall. With the right attachments, it can even be used for mixing paint or grout.

    • How It Saves Time and Money: Instead of manually screwing or drilling, a power drill speeds up the process, reducing hand fatigue and ensuring consistent results.

    • Recommended Products at Lowe’s: The DEWALT 20-Volt Max Cordless Drill/Driver Kit is a durable and high-performing option for homeowners.

  2. Circular Saw

    • Why It’s Essential: Circular saws are perfect for making straight cuts in wood, plastic, and even metal. They’re ideal for projects like building shelves, cutting floorboards, or framing walls.

    • How It Saves Time and Money: Precision and speed are crucial in construction tasks, and a circular saw delivers both. This reduces material waste and accelerates the workflow.

    • Recommended Products at Lowe’s: The Kobalt 7-1/4-Inch Corded Circular Saw is a reliable and affordable choice.

  3. Miter Saw

    • Why It’s Essential: A miter saw is your go-to tool for making angled cuts, essential for crown molding, baseboards, and framing.

    • How It Saves Time and Money: Its accuracy eliminates the trial-and-error approach, ensuring clean, professional results on the first attempt.

    • Recommended Products at Lowe’s: The Bosch 10-Inch Dual-Bevel Sliding Compound Miter Saw is a favorite among DIYers for its precision and ease of use.

  4. Jigsaw

    • Why It’s Essential: When it comes to cutting curves or intricate shapes, a jigsaw is unmatched. It’s perfect for customizing furniture or adding decorative touches to woodwork.

    • How It Saves Time and Money: Instead of outsourcing detailed cuts, a jigsaw lets you do it yourself, adding a personal touch to your projects.

    • Recommended Products at Lowe’s: The BLACK+DECKER 5-Amp Variable Speed Corded Jigsaw is a budget-friendly and reliable option.

  5. Oscillating Multi-Tool

    • Why It’s Essential: This versatile tool can sand, cut, grind, and scrape, making it a must-have for renovations involving tight spaces or detailed work.

    • How It Saves Time and Money: Its adaptability means you can use one tool for multiple tasks, reducing the need to buy or rent additional equipment.

    • Recommended Products at Lowe’s: The Fein StarlockPlus Multi-Tool is a premium choice known for its durability and performance.

  6. Cordless Nail Gun

    • Why It’s Essential: A nail gun speeds up installation for tasks like attaching trim, building furniture, or framing walls.

    • How It Saves Time and Money: By eliminating the need for manual nailing, it reduces strain and ensures consistent, professional results.

    • Recommended Products at Lowe’s: The PORTER-CABLE 20-Volt Max Cordless Brad Nailer is a lightweight and efficient option.

  7. Angle Grinder

    • Why It’s Essential: This tool is perfect for cutting, grinding, and polishing metal, tile, and concrete surfaces.

    • How It Saves Time and Money: It’s a versatile solution for handling tough materials, reducing the need for professional services.

    • Recommended Products at Lowe’s: The DEWALT 4-1/2-Inch Paddle Switch Corded Angle Grinder is a reliable pick for DIY projects.

Mastering Your Tools with Detroit Training Center

Learning how to safely and effectively use these power tools is crucial for achieving professional-quality results. At Detroit Training Center, our home renovation workshops provide hands-on training to help you master these essential tools. Held every Saturday, these sessions cover everything from basic operations to advanced techniques, ensuring participants gain practical skills they can apply immediately.

For instance, in our Intro to Power Tools class, participants learn how to:

  • Select the right blade or bit for specific materials.

  • Adjust tool settings for optimal performance.

  • Maintain tools for longevity and safety.

By the end of the workshop, you’ll not only know how to operate these tools but also how to tackle common renovation challenges with confidence.

The Cost-Saving Benefits of DIY Home Renovation

Hiring contractors for home renovations can quickly add up. While professional expertise is valuable, many tasks can be handled by homeowners who invest in the right tools and training. By attending workshops and practicing your skills, you can:

  • Avoid labor costs by completing projects yourself.

  • Reduce material waste through precise measurements and cuts.

  • Increase the value of your home with high-quality, DIY renovations.

Additionally, shopping for tools and materials at retailers like Lowe’s allows you to take advantage of promotions and discounts, further stretching your renovation budget.

Tips for Building Your Tool Collection

Starting your power tool collection doesn’t have to break the bank. Here are a few tips:

  • Buy Combo Kits: Many manufacturers offer combo kits that include multiple tools, often at a lower price than buying each tool individually. For example, the DEWALT 20-Volt Max 5-Tool Combo Kit at Lowe’s is a great starter pack.

  • Invest in Quality: While it might be tempting to go for the cheapest option, investing in durable, high-quality tools ensures better performance and longevity.

  • Rent Before You Buy: If you’re unsure about committing to a specific tool, consider renting it first. Lowe’s offers tool rental services that allow you to try before you buy.

Ready to Transform Your Home?

Empowering yourself with the right tools and skills is the first step to transforming your home and saving money in the process. Detroit Training Center’s home renovation workshops are the perfect opportunity to build your confidence, learn from experts, and connect with like-minded DIY enthusiasts. Paired with the quality tools available at Lowe’s, you’ll be well-equipped to tackle any renovation project that comes your way.

Sign up for a Saturday workshop at Detroit Training Center today and unlock the full potential of your toolbox. Your dream home renovation is just a power tool away!

Top 5 Must-Have Tools for Rough Carpenters

When stepping into the world of rough carpentry, having the right tools can make or break your project. Larry, our seasoned workshop instructor, swears by a few essential tools that every carpenter should have in their arsenal. Here are Larry’s top five must-have tools for rough carpenters, all of which you can find at Lowe's.

1. Circular Saw

A circular saw is indispensable for cutting lumber quickly and accurately. Larry’s go-to choice is the DEWALT 15-Amp 7-1/4-in Worm Drive Corded Circular Saw. With its powerful motor and lightweight design, this saw allows you to tackle framing, decking, and other structural tasks with ease. It’s robust, reliable, and versatile—perfect for carpenters at any skill level.

2. Hammer

No carpenter’s toolkit is complete without a high-quality hammer. Larry recommends the Kobalt 22-oz Smooth Face Steel Head Steel Claw Hammer. Its solid steel construction ensures durability, while the ergonomic handle reduces hand fatigue during prolonged use. Ideal for driving nails into tough lumber, this hammer is a must-have for framing and general carpentry work.

3. Tape Measure

Precision is key in rough carpentry, and a reliable tape measure is your best friend. Larry’s favorite is the CRAFTSMAN HI-VIS 25-ft Tape Measure. Its sturdy blade and standout length make measuring large spans easy, while the high-contrast markings ensure accuracy in low-light conditions.

4. Speed Square

For marking and measuring angles quickly, a speed square is essential. Larry suggests the Swanson 8-Inch Speed Square (available at Lowe’s). This versatile tool doubles as a protractor, saw guide, and ruler, making it invaluable for cutting accurate angles and ensuring structural integrity in your projects.

5. Power Drill

Whether you’re driving screws or drilling pilot holes, a reliable power drill is crucial. Larry’s pick is the Kobalt 24-volt 1/2-in Keyless Brushless Cordless Drill. With its long-lasting battery, multiple speed settings, and comfortable grip, this drill ensures efficiency and precision in every task.

Join Larry’s Carpentry Workshop

Want to learn how to use these tools like a pro? Join Larry for the Rough Carpentry Basic and Advanced Workshops on January 18th. These hands-on sessions are perfect for beginners and seasoned carpenters looking to refine their skills.

  • Basic Workshop: 9:30 AM–$70

  • Advanced Workshop: 1:30 PM–$70

  • Both Sessions: $120

Participants will gain practical experience with tools like those listed above, and Larry will share expert tips and tricks to enhance your craftsmanship.

Reserve your spot today and elevate your carpentry game!

Conclusion

Equipping yourself with these top tools is the first step to mastering rough carpentry. With Larry’s guidance and these high-quality picks from Lowe’s, you’ll be ready to tackle any project with confidence and skill. Don’t miss out on this opportunity to learn from one of the best in the business!

DIY vs. Professional Hardwood Floor Refinishing: What’s Right for You?

Photo by Jordan Harris

Refinishing hardwood floors can dramatically improve the look and longevity of your flooring, but deciding whether to take on the project yourself or hire a professional can be challenging. Both approaches have their pros and cons, and the best choice depends on factors like your skill level, budget, and the scope of the project. At Detroit Training Center, we’re here to help you weigh the options so you can make an informed decision.

DIY Hardwood Floor Refinishing

Taking the DIY route can be a rewarding experience, but it’s not without its challenges.

Advantages:

  1. Cost Savings: Doing the work yourself eliminates labor costs, making it a more budget-friendly option.

  2. Personal Satisfaction: Completing a refinishing project on your own can be incredibly fulfilling.

  3. Flexible Scheduling: You have control over when and how quickly you complete the project.

Challenges:

  1. Steep Learning Curve: Refinishing requires knowledge of sanding equipment, stain application, and proper sealing techniques. Mistakes can lead to costly repairs.

  2. Time-Consuming: Refinishing is labor-intensive and can take days to complete, especially for beginners.

  3. Equipment Costs: Renting or purchasing professional-grade tools like drum sanders and edgers can add to your expenses.

DIY refinishing is best suited for small projects or homeowners with prior experience working with tools and finishes.

Professional Hardwood Floor Refinishing

Hiring a professional may be the best option for homeowners who want flawless results with minimal effort.

Advantages:

  1. Expertise and Precision: Professionals have the skills and experience to handle challenges like uneven floors, deep scratches, and tricky corners.

  2. Time Efficiency: A pro can complete the job quickly and efficiently, saving you time and stress.

  3. High-Quality Results: Professionals use top-tier equipment and products, ensuring a durable and beautiful finish.

  4. Warranty: Many professionals offer warranties for their work, giving you peace of mind.

Challenges:

  1. Higher Costs: Professional services are more expensive due to labor and expertise.

  2. Less Control: You’ll need to coordinate scheduling and may have limited input on the process.

Professional refinishing is ideal for large areas, heavily damaged floors, or homeowners seeking a polished, high-end finish without the hassle of DIY.

Making the Right Choice

To decide between DIY and professional refinishing, consider the following:

  • Budget: If saving money is your top priority and you’re confident in your skills, DIY may be the way to go.

  • Time: For those with tight schedules, hiring a professional ensures the job is completed quickly and efficiently.

  • Skill Level: Refinishing requires a steady hand and attention to detail. If you’re inexperienced, hiring a pro can prevent costly mistakes.

  • Project Scope: Large or heavily damaged floors may require the expertise and tools of a professional.

Learn the Skills at Detroit Training Center

If you’re leaning toward DIY but lack the confidence, consider joining a Hardwood Floor Refinishing Workshop at Detroit Training Center. Our hands-on classes teach you the skills and techniques needed to achieve professional-quality results, from sanding to staining and finishing.

Final Thoughts

Both DIY and professional hardwood floor refinishing have their advantages, and the right choice depends on your priorities and abilities. Whether you decide to tackle the project yourself or hire an expert, refinishing your floors is a worthwhile investment in your home’s beauty and value.

Visit Detroit Training Center’s website to learn more about our workshops and resources, or contact us to find the support you need to make your refinishing project a success!

The Benefits of Refinishing Instead of Replacing Hardwood Floors

Photo by Jordan Harris

Hardwood floors are a timeless feature that adds beauty, value, and warmth to any home. Over time, however, they can become scratched, stained, or dulled by daily wear and tear. When this happens, homeowners often face a choice: refinish the floors or replace them entirely. At Detroit Training Center, we advocate for refinishing as a cost-effective, environmentally friendly, and practical solution that can make your floors look as good as new.

1. Cost Savings

Replacing hardwood floors is a significant investment, involving not only the cost of new materials but also labor-intensive installation fees. Refinishing, on the other hand, is a fraction of the cost. By sanding away imperfections and applying a fresh stain and finish, you can breathe new life into your existing floors without breaking the bank.

Additionally, refinishing allows you to avoid the expenses associated with removing and disposing of old flooring materials, making it a budget-friendly choice for most homeowners.

2. Preserve High-Quality Materials

Many older homes feature hardwood floors made from premium-quality materials that are difficult to find today. Refinishing allows you to preserve the original character and craftsmanship of these floors while extending their lifespan.

Rather than replacing solid hardwood with lower-quality engineered wood or laminate, refinishing ensures you’re retaining a durable, natural material that can withstand decades of use.

3. Customization Options

Refinishing gives you the opportunity to customize the look of your floors without replacing them. By choosing a new stain color or finish, you can completely transform the appearance of a room to match evolving trends or personal preferences.

Whether you prefer a sleek, modern gray tone or a classic warm walnut finish, refinishing allows you to tailor your floors to suit your style without the hassle of installing new materials.

4. Environmentally Friendly

Replacing hardwood floors generates significant waste, as old flooring often ends up in landfills. Refinishing, however, is a sustainable option that minimizes environmental impact by reusing existing materials.

By choosing to refinish, you’re reducing the demand for new wood, conserving natural resources, and contributing to a greener future.

5. Enhance Home Value

Beautiful hardwood floors are a major selling point for any home. Refinishing enhances their appearance and longevity, boosting your property’s value and appeal to potential buyers.

A well-maintained floor not only creates a positive first impression but also demonstrates that the home has been cared for, making refinishing a smart investment for homeowners.

Learn the Art of Floor Refinishing at Detroit Training Center


Photo by Jordan Harris

At Detroit Training Center, we offer hands-on workshops designed to teach you the skills needed to refinish hardwood floors like a professional. Our classes cover every step of the process, from preparation and sanding to staining and applying a durable finish.

Whether you’re a homeowner tackling a DIY project or a contractor looking to expand your skill set, our workshops provide expert guidance, practical tips, and the confidence to achieve stunning results.

Final Thoughts

Refinishing hardwood floors is a cost-effective, eco-friendly, and rewarding alternative to replacement. With the proper tools and techniques, you can restore your floors to their original beauty while saving money and preserving valuable resources.

Join a Hardwood Floor Refinishing Workshop at Detroit Training Center to gain the knowledge and skills needed to transform your floors. Visit our website or contact us today to explore upcoming classes and register for your spot!

Residential Weatherization: A Guide for Homeowners and Landlords

Photo By: Jordan Harris

As temperatures drop, homeowners and landlords alike face rising utility bills, which makes weatherization an essential consideration. Properly weatherizing a home not only lowers energy costs but also creates a comfortable living environment and increases property value. Whether you’re a homeowner or looking to become a landlord, understanding weatherization basics can help you create an energy-efficient and cost-effective space.

Why Weatherization is Important

  1. Energy Savings: Weatherization reduces heating and cooling costs by sealing leaks and insulating walls, floors, and attics. This improves a home's overall efficiency and can cut energy bills by up to 30%.

  2. Increased Property Value: Homes that are energy-efficient are more attractive to buyers and renters, potentially raising property values.

  3. Enhanced Comfort: Weatherization prevents drafts and maintains consistent indoor temperatures, creating a more comfortable living environment for tenants and homeowners alike.

  4. Environmental Impact: Weatherized homes consume less energy, leading to reduced carbon emissions and a more eco-friendly lifestyle.

Lowe’s, as a proud sponsor of Detroit Training Center (DTC), offers a wide variety of products that make weatherizing your home easy and affordable. This guide includes DIY steps using products available at Lowe’s to help you get started. If you're interested in hands-on learning, join us at DTC for an in-depth Residential Weatherization Workshop on November 23rd at 1:30 PM. In this workshop, you’ll learn techniques to improve your home’s efficiency, comfort, and value.

Diversity in the Trades: How Inclusive Practices Benefit Everyone

Diversity and inclusion in the trades are increasingly recognized as essential for innovation, safety, and economic growth. By fostering inclusive practices, trade schools and industries create more dynamic, adaptable, and robust workforces that better reflect the communities they serve. At Detroit Training Center (DTC), we are dedicated to promoting diversity and inclusivity, not only because it’s the right thing to do, but because it strengthens the skilled trades sector as a whole.

Why Diversity in the Trades Matters

The skilled trades, including fields such as construction, welding, HVAC, and automotive repair, have historically been male-dominated, with limited representation of women, people of color, and other minority groups. This lack of diversity can lead to a narrow range of perspectives and hinder the industry’s growth and resilience. Bringing diverse voices into these trades adds fresh ideas, viewpoints, and problem-solving approaches that enrich the industry. Additionally, as communities and workplaces become more diverse, having a workforce that reflects this diversity is essential for building trust and engaging with clients and colleagues effectively.

The Benefits of Inclusive Trade Schools

Inclusive practices in trade schools set the stage for diverse workforces and open new doors for students who may not have considered the trades as a viable career option. Detroit Training Center, for example, provides programs and resources aimed at underrepresented groups, including women, veterans, and individuals from economically disadvantaged backgrounds. By fostering an inclusive environment, DTC helps ensure that all students feel welcome and supported as they pursue their career goals.

Trade schools with a commitment to diversity and inclusion create a supportive community where students from different backgrounds learn together and share experiences. This environment builds students' confidence and collaboration skills, helping them prepare for diverse workplaces. Furthermore, as trade schools attract a wider range of students, they help broaden the talent pool and address the current labor shortage affecting many skilled trades.

How Inclusion Enhances the Trades Industry

Diversity in the workforce goes beyond simple representation. An inclusive workplace encourages every team member to bring their best ideas to the table, which can lead to safer and more effective work practices. For instance, a more diverse workforce brings varied perspectives that can lead to innovations in problem-solving and risk management. Teams with diverse backgrounds are better equipped to foresee potential challenges and approach projects creatively, ultimately leading to higher-quality work and safer job sites.

Inclusive practices also attract clients and businesses that value diversity. Companies that demonstrate inclusivity in their hiring and operational practices are better positioned to gain the trust and loyalty of a diverse clientele, which can lead to increased business and positive community relationships.

Detroit Training Center’s Commitment to Diversity and Inclusion

Detroit Training Center is dedicated to creating an inclusive learning environment for all students, providing mentorship, resources, and support services to help underrepresented groups succeed. Our workshops and programs cover a variety of trades, including home renovation, carpentry, welding, and HVAC, offering individuals from all backgrounds the opportunity to develop practical skills that are in high demand.

By building diversity and inclusion into the fabric of DTC, we ensure our graduates are prepared to work effectively in diverse environments and bring their unique strengths to the skilled trades industry. Our commitment to inclusion is not just about bridging the employment gap but about fostering a culture where all students and professionals can thrive.

Moving Toward a More Inclusive Future

Diversity and inclusion are powerful forces for positive change in the trades. By embracing inclusive practices, trade schools and industries not only enrich the learning experience but also strengthen the trades sector as a whole. At Detroit Training Center, we believe that when we build diversity and inclusivity into our programs, we’re not only supporting our students but investing in a stronger, more resilient industry for everyone.

The Importance of Aluminum Trim for Vinyl Siding

Photo by: Jordan Harris

When it comes to enhancing curb appeal and protecting a home’s exterior, aluminum trim for vinyl siding is one of the most effective solutions available. Aluminum trim, sometimes referred to as “coil stock” or “trim coil,” is used to cover and protect wood fascia, soffits, and other exterior elements, preventing damage from weather and pests. This addition to vinyl siding is more than just decorative; it plays a crucial role in maintaining the durability and visual appeal of a home.

Why Aluminum Trim Matters

Aluminum trim provides a clean, polished finish that complements vinyl siding, elevating the overall appearance of a property. It’s also highly functional, acting as a barrier that prevents moisture from seeping into wood materials that would otherwise deteriorate over time. With the weather conditions we experience here in Michigan, where we often face humid summers and freezing winters, unprotected wood is prone to rot, mold, and insect damage. Aluminum trim, which doesn’t rust and requires minimal maintenance, creates a strong defense against these environmental factors.

Furthermore, aluminum trim offers homeowners a chance to add an extra layer of insulation. With its reflective properties, aluminum can help reduce heat transfer, making homes slightly more energy-efficient. This is particularly beneficial for those looking to improve energy conservation and reduce utility costs in the long term.

Choosing the Right Aluminum Trim Products

When selecting aluminum trim products, it’s essential to ensure they are compatible with the specific dimensions and needs of a project. At popular retailers like Lowe’s, products like the “Amerimax Home Products 14-in x 50-ft White Trim Coil” are widely available. This product offers excellent coverage and durability for various applications. Additionally, Lowe’s carries options in different finishes, such as the “Gibraltar Building Products Aluminum Trim Coil” in white or almond. This flexibility allows homeowners to match the trim with existing siding or other exterior accents for a cohesive, attractive look.

Using quality products is crucial, and Lowe’s is known for stocking high-grade aluminum trim solutions that offer both protection and aesthetic appeal. Pairing these with vinyl siding ensures that a property has a well-protected exterior capable of withstanding the rigors of Michigan’s climate.

Hands-On Learning at Detroit Training Center

For those looking to learn how to properly install aluminum trim for vinyl siding, Detroit Training Center is hosting an informative workshop on November 16th at 1:30 PM. This session will cover the basics of aluminum trim installation, including measuring, cutting, and securing trim for a professional-quality finish.

The cost for this workshop is $70 for a single session or $120 for two sessions, allowing participants to either learn the essentials or dive deeper with additional practice and expert guidance. This workshop is ideal for homeowners, DIY enthusiasts, and anyone in the trades looking to add aluminum trim installation to their skill set. In addition to hands-on training, attendees will gain insights on selecting the right tools and products, like those available at Lowe’s, to ensure high-quality results.

Secure Your Home’s Future with Aluminum Trim

Aluminum trim for vinyl siding is an investment in both the protection and appearance of a home. Whether it’s for an older home needing a facelift or a new build that requires extra protection, aluminum trim is an excellent choice. By attending the upcoming workshop at Detroit Training Center, participants can gain the skills needed to complete these projects with confidence. Don’t miss this opportunity to learn a valuable trade skill that will not only protect homes but also enhance their value and curb appeal.

Register today and take the first step towards mastering aluminum trim installation for a long-lasting, polished look that will stand up to Michigan’s unpredictable weather.

Share

The Benefits of Vinyl Siding for Michigan Homes: Durability, Insulation, and Cost Savings | (DTC Article)

When it comes to upgrading the exterior of your home, choosing the right siding material is critical. In Michigan, where homes face fluctuating temperatures, snow, rain, and high winds, homeowners need a siding option that is not only durable but also energy-efficient and affordable. Vinyl siding has become one of the most popular choices for Michigan homeowners for its numerous benefits, including long-lasting durability, improved insulation, and significant cost savings. At Detroit Training Center, we offer Vinyl Siding Workshops that teach homeowners and aspiring professionals the essential skills needed to install and maintain vinyl siding. These workshops are priced at $70 for one person and $120 for two, with sessions at 9:30 AM and 1:30 PM.

Let’s dive into the key reasons why vinyl siding is such a smart choice for homes in Michigan.

Durability to Withstand Michigan’s Harsh Weather

Michigan’s climate can be challenging for homes, with freezing winters, hot summers, and occasional storms. Vinyl siding is designed to endure these conditions with minimal maintenance. Unlike wood siding, which is prone to warping, rotting, or being damaged by insects, vinyl siding is highly resistant to moisture and pest infiltration. It doesn’t rot or decay and can stand up to heavy rain, snow, and ice, making it an ideal choice for Michigan’s variable weather.

Many high-quality vinyl siding products, like Georgia-Pacific Vision Pro Double 4-in Traditional White Vinyl Siding Panel available at Lowe’s, offer enhanced impact resistance, protecting homes from hail and wind-driven debris. The durability of vinyl siding means that it will continue to look great for years with little more than occasional cleaning.

Improved Insulation for Year-Round Comfort

Energy efficiency is a major concern for Michigan homeowners, especially during the cold winter months. Vinyl siding can provide excellent insulation, reducing the amount of heat lost from your home and keeping your energy bills lower. Some vinyl siding products are specifically designed with an insulated foam backing, such as Abolos Instaset Mastic Peel and Stick Mastic Adhesive 2-lb Tile Mastic, which adds an additional layer of thermal resistance to your home’s exterior.

This extra insulation can help keep your home warmer in the winter and cooler in the summer by reducing heat transfer through the walls. In addition to maintaining a comfortable indoor temperature, insulated vinyl siding reduces the strain on your HVAC system, leading to potential long-term energy savings. This is particularly beneficial in Michigan, where the heating and cooling systems work hard to keep up with the seasonal temperature swings.

Cost Savings and Low Maintenance

One of the biggest advantages of vinyl siding is its affordability. Vinyl siding is significantly less expensive than wood, brick, or stone while still offering a high-end appearance. Homeowners can install vinyl siding for a fraction of the cost of other materials, making it a budget-friendly option without sacrificing quality.

In addition to its low upfront cost, vinyl siding is incredibly low-maintenance. Unlike wood siding, which requires regular painting, staining, and sealing, vinyl siding retains its color and finish over time. A simple wash with soap and water once or twice a year is usually enough to keep vinyl siding looking fresh and clean. This ease of maintenance further reduces the long-term costs of owning a home with vinyl siding.

Learn Vinyl Siding Installation at Detroit Training Center

At Detroit Training Center, we offer hands-on Vinyl Siding Workshops designed to give participants practical experience in vinyl siding installation and maintenance. Whether you’re a homeowner looking to tackle a DIY project or someone interested in starting a career in home renovation, our workshop will provide you with the skills and confidence needed to install vinyl siding on your own. For just $70 for one person or $120 for two, you’ll gain valuable knowledge on material selection, cutting, and installation techniques, ensuring your siding project is a success.

Our workshops are available at 9:30 AM and 1:30 PM on scheduled Saturdays, providing flexible options to fit your schedule. Plus, all the materials you’ll need, including high-quality vinyl siding options like those from Lowe’s, will be covered in the training.

Conclusion

Vinyl siding offers an unbeatable combination of durability, insulation, and cost savings, making it an excellent choice for Michigan homes. If you’re considering upgrading your home’s exterior or want to learn the skills needed to tackle a siding project, be sure to sign up for our Vinyl Siding Workshop at Detroit Training Center. You’ll gain hands-on experience while learning how to install one of the most popular siding options for Michigan’s tough climate.

Choosing the Right Type of Home Insulation | (DTC Article)

Home insulation is essential for energy efficiency, comfort, and temperature control. With various insulation types available, it’s important to select the right kind for each area of your home. Here’s a guide to the different types of insulation and how to get them at Lowe’s, as well as an introduction to Detroit Training Center’s home renovation workshops, where you can learn how to install insulation yourself. Big thanks to our sponsor’s, again.

1. Fiberglass Batt Insulation

Fiberglass batt insulation is one of the most popular choices for homeowners, especially for attics and walls. This insulation type is made of flexible fibers and comes in pre-cut panels, making it easier to install. Lowe’s offers a range of options, including the Owens Corning R-15 Wall Kraft Faced Fiberglass Batt Insulation, which provide excellent thermal performance and are easy to handle.

Where to Use Fiberglass Batt Insulation

Fiberglass batts are ideal for attic floors, wall cavities, and between floor joists. They’re also fire-resistant, which is an added benefit for areas near heating appliances or electrical wiring.

Where to Buy

You can find Owens Corning and other fiberglass insulation products at your local Lowe’s store, as well as on their website. These batts come in various sizes, so you can choose the right thickness and R-value based on your project.

2. Blown-In Cellulose Insulation

Blown-in cellulose insulation is a loose-fill option commonly used in hard-to-reach areas, such as attics and wall cavities. It’s made of recycled materials, which makes it an eco-friendly choice. Lowe’s carries US Greenfiber R-60 Cellulose Blown-In Insulation Sound Barrier, known for its high density, which offers excellent soundproofing and energy efficiency.

Where to Use Blown-In Cellulose Insulation

Blown-in cellulose is best for attics and closed wall cavities where you want to add insulation without extensive demolition. It can be blown into tight spaces using a blower machine, which Lowe’s often offers for rent if you purchase insulation in-store.

Where to Buy

GreenFiber cellulose insulation is available at Lowe’s, and you can also rent the necessary equipment to install it.

3. Spray Foam Insulation

Spray foam insulation is a versatile option for sealing gaps, cracks, and spaces where air leaks might occur. It expands to fill cavities and offers a high R-value, making it effective for both insulation and air sealing. Lowe’s offers Froth-Pak Low GWP 210 Insulation Foam Kit.


, which includes everything you need to apply spray foam insulation yourself.

Where to Use Spray Foam Insulation

Spray foam is great for crawl spaces, basement walls, and around windows and doors where drafts are common. It provides a strong seal against moisture and air infiltration.

Where to Buy

The Dow FROTH-PAK kits are available at Lowe’s, offering different sizes depending on your needs.

4. Rigid Foam Board Insulation

Rigid foam board insulation is a durable, moisture-resistant option for basement walls, foundation exteriors, and under floors. Lowe’s offers Kingspan Insulation Unfaced Foam Board Insulation, a high-performance choice for various applications.

Where to Use Rigid Foam Board Insulation

This insulation type is suitable for areas where you need a thin, yet effective, insulation layer. It’s commonly used on foundation walls and can also be installed beneath floors or siding.

Where to Buy

Kingspan foam board insulation is stocked at Lowe’s and is available in different thicknesses and R-values.

Learn to Install Insulation at Detroit Training Center

Detroit Training Center offers Home Renovation Workshops that cover everything you need to know about insulation. From understanding R-values to hands-on installation techniques, our workshops give you the skills and confidence to tackle insulation projects in your own home. Whether you’re interested in attic insulation, basement walls, or creating an energy-efficient space, our expert instructors guide you every step of the way.

Register Today!

Ready to take on home insulation? Register for a workshop at Detroit Training Center’s website or call us at (313)-221-5876. At just $70 per workshop or $120 for two, our hands-on training will set you up for success in creating a more comfortable and energy-efficient home.

Step-by-Step Guide to Installing Ceramic Tile Floors and Backsplash | (DTC Article)

Installing ceramic tile floors and backsplash can transform any space, adding style and durability to your home. Whether you’re working on a kitchen renovation, bathroom upgrade, or simply updating a room, ceramic tiles are a great option for their beauty and long-lasting quality. At Detroit Training Center, our Ceramic Tile Floors and Backsplash Workshop will teach you the essential skills to complete these projects with confidence. With workshops priced at $70 for one person and $120 for two, you can attend at 9:30 AM or 1:30 PM and get hands-on experience in tiling techniques.

This article provides a step-by-step guide to installing ceramic tiles, giving you a taste of what you’ll learn in the workshop, while highlighting the importance of quality products like those available at Lowe’s.

Step 1: Gather Your Materials

Before beginning any tile installation project, it’s important to have all the necessary tools and materials. For a professional-quality finish, you’ll need:

  • Ceramic tiles (available at Lowe’s, like Style Selections Brighton Ceramic Tile)

  • Tile adhesive or mortar

  • Notched trowel (for spreading adhesive)

  • Tile spacers

  • Tile cutter or wet saw

  • Grout (Lowe’s offers TEC Power Grout for durability)

  • Grout float (for applying grout)

  • Sponges and buckets (for cleaning)

All of these products can be found at Lowe’s to ensure you have the right materials for a high-quality finish.

Step 2: Prepare the Surface

Proper surface preparation is key to a successful tile installation. You’ll learn this critical step during our workshop, where our instructors will show you how to assess and prepare your workspace.

  • For floors, ensure the subfloor is clean, dry, and level. If necessary, use a self-leveling compound to smooth out any uneven areas.

  • For backsplashes, make sure the wall is free of grease, dirt, or loose paint.

In both cases, applying a primer or backer board may be needed, depending on the condition of your surfaces.

Step 3: Apply Adhesive

Using a notched trowel, spread tile adhesive (also called mortar) onto the surface. Hold the trowel at a 45-degree angle to create grooves that help the tiles adhere better. At the Detroit Training Center, you’ll learn how to properly apply the right amount of adhesive to avoid messes or uneven tiles.

Step 4: Lay the Tiles

Once the adhesive is applied, it’s time to start laying your tiles. Press each tile firmly into the adhesive and place tile spacers between them to maintain consistent spacing. Begin from the center of your surface and work outward to avoid awkward cuts along the edges.

For cutting tiles around edges or obstacles, a tile cutter or wet saw is essential. Lowe’s offers great options like the Kobalt Tile Saw, which is perfect for making precise cuts.

Step 5: Apply Grout

After the adhesive has dried (typically 24 hours), remove the tile spacers and prepare to grout. Using a grout float, spread the grout over the tiles, pressing it into the spaces between. This step ensures the tiles stay securely in place while adding a finished look. You’ll learn proper grout application techniques during the workshop, as well as how to select the best grout for your project.

Once the grout is applied, use a damp sponge to wipe away excess grout from the tile surface, taking care not to disturb the grout lines.

Step 6: Clean and Finish

After the grout has set, perform a final cleaning of the tile surface to remove any haze left behind. A clean, polished look is the result of careful cleaning techniques, which we also cover in our Ceramic Tile Workshop.

Hands-On Experience at Detroit Training Center

At Detroit Training Center’s Ceramic Tile Floors and Backsplash Workshop, you’ll get hands-on experience with these steps, ensuring you have the confidence to complete tiling projects at home. You’ll learn not only how to prepare surfaces, apply adhesive, and grout tiles, but also how to troubleshoot common tiling issues and work with a variety of materials.

Workshops are available for $70 for one person and $120 for two, with sessions starting at 9:30 AM and 1:30 PM. These interactive workshops provide expert guidance in a supportive learning environment.

Shop Lowe’s for Quality Tile Products

To ensure the best results, using high-quality materials is essential. Lowe’s carries everything you need to get started, from ceramic tiles like Style Selections Brighton Ceramic Tile to adhesive, grout, and tools like the Kobalt Tile Saw. With their wide selection, you’ll find everything you need to complete your ceramic tile project with confidence.

Sign up for the Detroit Training Center Ceramic Tile Workshop today, and start transforming your space with beautiful, durable ceramic tiles!

4o

A Comprehensive Guide to Different Types of Laminate Flooring: Choosing the Best Option for Your Home

Laminate flooring has become a popular choice for homeowners looking to achieve a stylish and durable look at an affordable price. With advances in design and technology, laminate floors now mimic the appearance of real wood, stone, and tile, making them a versatile option for any room in your home. At Detroit Training Center, we emphasize the importance of choosing the right flooring for your projects. In this guide, we’ll explore the different types of laminate floors and how they can enhance your space.

What is Laminate Flooring?

Laminate flooring is a multi-layered synthetic product that replicates the look of natural materials like wood or stone. Its top layer, known as the wear layer, is designed to withstand wear and tear, while the core layer provides stability. The best part about laminate flooring is that it offers the beauty of natural materials without the high cost or extensive maintenance.

Types of Laminate Flooring Based on Texture

When choosing laminate flooring, texture plays a significant role in its appearance and feel underfoot. Here are the main types of textures available:

  1. Smooth Finish
    Smooth laminate flooring is sleek and modern, making it a great choice for contemporary spaces. Its flat surface gives a polished appearance, and it’s easy to clean and maintain. This option works well in areas like kitchens and living rooms where you want a refined look without the heavy grain patterns of natural wood. For a smooth finish, Lowe’s offers an excellent selection like Style Selections Deep Oak Laminate Flooring.

  2. Embossed Laminate
    For a more authentic wood feel, embossed laminate flooring features grain patterns that are pressed into the surface. This texture mimics the natural imperfections of real wood, providing a more rustic and natural look. Embossed laminate is perfect for adding character to spaces like bedrooms or dining rooms. Lowe’s Pergo TimberCraft + WetProtect Waterproof Embossed Laminate is a great option for homeowners seeking both beauty and durability.

  3. Hand-Scraped Laminate
    If you love the look of distressed wood, hand-scraped laminate offers the perfect solution. With its rough, textured finish, hand-scraped laminate adds depth and charm to any room. It’s ideal for homeowners who want a more vintage or country-style appearance. Consider Lowe’s Allen + Roth Hand-Scraped Oak Laminate Flooring for a timeless, rustic aesthetic.

  4. Textured Laminate
    Textured laminate is designed to replicate the look and feel of natural wood or stone even more accurately. The grain pattern aligns with the printed design on the laminate, creating a highly realistic effect. This type is ideal for areas where you want the closest imitation of wood without the maintenance. Pergo Outlast+ Waterproof Laminate available at Lowe’s provides a beautifully textured surface that’s both functional and stylish.

Types of Laminate Flooring Based on Thickness

Laminate flooring comes in various thicknesses, usually ranging from 6mm to 12mm. The thicker the laminate, the more durable and sound-absorbing it will be.

  • 6mm to 7mm: Thin laminate flooring is a budget-friendly option and works well in low-traffic areas like bedrooms.

  • 8mm to 12mm: Thicker laminate is more durable and provides better soundproofing. It’s ideal for high-traffic areas like living rooms, hallways, and kitchens.

Lowe’s carries a wide variety of laminate options in different thicknesses to suit your needs.

Why Choose Laminate Flooring?

Laminate flooring is a fantastic option for homeowners who want a stylish, durable, and low-maintenance surface. It’s easy to install, clean, and maintain, making it a top choice for busy households. Additionally, laminate is more resistant to scratches, moisture, and wear compared to traditional hardwood, making it an ideal choice for families with pets and children.

Shop for Laminate Flooring at Lowe’s

Whether you’re looking for a smooth, embossed, hand-scraped, or textured finish, Lowe’s has a laminate flooring option to suit your style and budget. Visit your local Lowe’s or shop online to explore their extensive collection of laminate flooring products. With their wide range of designs and finishes, you’re sure to find the perfect floor to transform your home.

At Detroit Training Center, we encourage our students to understand the variety of materials available and how to choose the best one for each project. Laminate flooring is a fantastic, versatile option for any renovation, offering beauty and practicality at an affordable price.

Share

Energy Efficiency Starts Here: The Benefits of Residential Insulation | (DTC Article)

As energy costs continue to rise and homeowners seek more ways to reduce their environmental impact, proper home insulation has become a crucial aspect of any energy efficiency strategy. Insulation is one of the most effective ways to make a home more energy-efficient, and its benefits go beyond just reducing heating and cooling bills. At Detroit Training Center, we believe in empowering homeowners and aspiring professionals with the skills needed to improve energy efficiency. Our Residential Insulation Workshops, priced at $70 for one person and $120 for two, offer a hands-on learning experience that provides practical skills for creating a more comfortable, cost-effective home. Workshops are held at 9:30 AM and 1:30 PM on scheduled days.

The Importance of Proper Insulation

Proper insulation is key to maintaining a consistent and comfortable temperature in your home year-round. Whether you’re dealing with Michigan's freezing winters or hot summers, insulation helps keep warm air in during the winter and hot air out in the summer. Without adequate insulation, homes are prone to temperature fluctuations, which force HVAC systems to work harder to maintain a stable climate, leading to higher energy bills.

Insulation not only reduces energy consumption but also enhances the overall comfort of your home by minimizing drafts, hot spots, and cold zones. In addition, well-insulated homes experience less wear and tear on their heating and cooling systems, which can extend the lifespan of HVAC equipment and reduce the need for costly repairs or replacements.

How Insulation Reduces Energy Costs

One of the most compelling reasons to insulate your home is the financial benefit. Insulation reduces the need for constant heating and cooling, which can cut energy bills by up to 15% or more, depending on the extent of the insulation. This means that the cost of installing or upgrading insulation can be recovered through savings on utility bills over time.

Homes that are poorly insulated lose significant amounts of energy through the walls, roof, and floors. By installing high-quality insulation in these areas, homeowners can create a barrier that slows down the transfer of heat, keeping indoor temperatures stable. This helps reduce the strain on air conditioners and heaters, leading to more efficient energy usage.

What’s Covered in the Detroit Training Center Workshop

At Detroit Training Center, our Residential Insulation Workshops are designed for both beginners and those with some experience who want to deepen their knowledge. We cover everything from the basics of insulation materials to advanced installation techniques. Here's what participants can expect to learn:

  1. Understanding Different Types of Insulation: Learn about the various types of insulation, including fiberglass, foam, cellulose, and spray foam, and how to select the right type for different areas of a home.

  2. Installation Techniques: Our instructors will guide you through the proper methods for installing insulation in walls, attics, floors, and crawl spaces to ensure optimal energy efficiency.

  3. Air Sealing and Moisture Control: Insulation works best when combined with air sealing. We’ll teach you how to identify and seal air leaks that can undermine insulation efforts and cause drafts. We'll also cover moisture control methods to prevent mold and mildew issues.

  4. Energy Savings and ROI: We’ll help you understand how insulation improvements can impact energy bills and calculate the return on investment (ROI) for your home projects.

Workshop Details and Registration

Our Residential Insulation Workshop is ideal for homeowners looking to DIY their insulation projects or for those considering a career in home energy efficiency. Whether you’re attending alone or bringing a friend for the discounted price of $120 for two people, this workshop provides invaluable hands-on experience. We offer two convenient time slots: 9:30 AM and 1:30 PM on scheduled Saturdays.

With expert guidance from our experienced instructors, participants will gain the confidence and skills needed to take on insulation projects that improve comfort and cut energy costs.

Sign Up Today

Don’t miss this opportunity to learn a valuable skill that can save you money and increase the comfort of your home. Register today for Detroit Training Center's Residential Insulation Workshop, and start your journey towards energy efficiency!

The Basics of Carpet Installation and When to Hire a Professional | (DTC Article)

Photo By The Home Depot

Installing carpet is a rewarding project that can transform a room's look and feel, but it's essential to understand the process before diving in. Whether you're planning a DIY installation or considering hiring a professional, here's a breakdown of the basics of carpet installation, the materials you’ll need, and when it’s best to seek expert help. Major shout out to our partners at Lowe’s.

The Carpet Installation Process

  1. Preparing the Subfloor Before installing carpet, the subfloor must be clean, level, and dry. If there are any cracks or imperfections, they should be repaired to prevent issues down the line. You may also need to install a moisture barrier, especially for rooms like basements.

  2. Laying Carpet Padding Carpet padding is crucial for both comfort and longevity. It provides a cushion beneath the carpet and helps extend its lifespan. When selecting padding, Lowe’s offers options like QuietWalk 11-mm 8 Density Synthetic Fiber Carpet Padding with Moisture Barrier, which is durable and provides extra support.

  3. Cutting and Laying the Carpet After laying the padding, it’s time to cut the carpet to size. Measure carefully to ensure you have enough carpet to cover the entire area. Use a utility knife to trim excess material and a carpet stretcher to lay the carpet tightly over the padding.

  4. Securing the Carpet Once the carpet is in place, tack strips are used to secure the edges. These strips hold the carpet tightly to the floor, ensuring a snug fit. Make sure to use a knee kicker to stretch the carpet onto the tack strips properly.

  5. Trimming and Finishing After stretching and securing the carpet, trim the edges and tuck them under baseboards for a clean, professional finish. At this stage, you may also need to seam multiple pieces of carpet together, using seam tape and a seam iron to create smooth transitions between pieces.

When Should You Hire a Professional?

While carpet installation can be a fun DIY project, there are certain situations where hiring a professional is the best option. Here are a few instances where it's wise to get expert help:

  • Complex Layouts: If your room has an irregular shape, multiple seams, or tricky areas like stairs, a professional installer will have the experience to handle these challenges with ease.

  • Larger Projects: Installing carpet in larger areas, like entire floors or commercial spaces, can be time-consuming and require specialized tools. Professional installers can complete the job quickly and efficiently.

  • High-End Carpeting: If you’re investing in high-end carpets, like Stainmaster Luxerell Nylon from Lowe’s, it’s worth ensuring the installation is flawless to protect your investment.

  • Time Constraints: If you need the project completed on a tight timeline, a professional can get the job done faster and with precision.

Join Our Carpet Installation Workshop!

Interested in learning how to install carpet yourself? Detroit Training Center is offering a Carpet Installation Workshop on October 26, 2024, at 9:30 AM for just $70. In this hands-on workshop, you’ll learn the essential skills and techniques for installing carpet from scratch, guided by industry professionals.

Whether you’re preparing for your first DIY project or want to gain practical experience, this workshop is perfect for you. You’ll also get to work with professional tools and products similar to those you can find at Lowe’s, like the Foss Polyester Padding and Kobalt Knee Kicker.

Sign up now and reserve your spot! Visit Detroit Training Center or call us at (313)-221-5876 to register.

PPE and Best Practices on the Job Site | (DTC Article)

Safety is a top priority on any construction site, especially for rough carpenters. Working with heavy tools, lumber, and machinery presents numerous hazards that can lead to serious injuries if proper precautions aren't taken. That’s why the use of personal protective equipment (PPE) and adherence to best practices is essential for protecting yourself and others on the job.

This article will outline the key PPE items every rough carpenter should wear and the best safety practices to follow while working. For those interested in hands-on carpentry training, Detroit Training Center’s Home Renovation Workshops provide a safe, structured environment where you can develop your skills under the guidance of industry professionals. We’ll also highlight some of the PPE products available at Lowe’s, ensuring you’re well-equipped for your next carpentry project and promoting our branded partners.

1. Head Protection: Hard Hats

One of the most critical pieces of PPE for rough carpentry is the hard hat. Whether you’re framing walls, installing roof trusses, or working in areas where materials are being moved overhead, a hard hat is vital for protecting your head from falling objects, debris, and accidental bumps.

Best Practices for Head Protection:

  • Wear a hard hat at all times when working on-site, particularly when overhead work is taking place.

  • Regularly inspect your hard hat for cracks or wear. Replace it immediately if you notice any damage.

  • Choose a lightweight, comfortable hard hat to ensure it doesn’t become a burden during long workdays.

Recommended Product at Lowe’s:

  • 3M Full Brim Quick Adjusting Ratchet White Hard Hat
    This hard hat provides excellent protection while offering comfort and breathability through venting, perfect for hot job sites. The suspension system ensures a secure fit, and the bright color enhances visibility.

2. Eye Protection: Safety Glasses or Goggles

In rough carpentry, you’re constantly cutting, sawing, and nailing materials, all of which create flying debris that could injure your eyes. Safety glasses or goggles protect your eyes from dust, wood chips, and other hazards.

Best Practices for Eye Protection:

  • Always wear safety glasses or goggles when operating power tools like circular saws, drills, and nail guns.

  • Opt for anti-fog lenses to ensure clear vision in hot or humid conditions.

  • Safety goggles are preferable for dusty environments where particles are more likely to reach your eyes.

Recommended Product at Lowe’s:

3. Hearing Protection: Earplugs or Earmuffs

The loud noise from power tools such as circular saws, drills, and hammers can cause long-term hearing damage if you’re exposed for extended periods. Hearing protection—either earplugs or earmuffs—is a must-have for rough carpenters.

Best Practices for Hearing Protection:

  • Wear earplugs or earmuffs whenever operating loud tools or equipment.

  • For best results, invest in noise-canceling earmuffs or high-quality earplugs designed to block excessive noise levels.

  • Be mindful of your surroundings; use hearing protection that still allows for situational awareness on a busy job site.

Recommended Product at Lowe’s:

4. Hand Protection: Work Gloves

Rough carpentry often involves handling rough materials, sharp tools, and heavy lumber, making work gloves a critical part of your PPE. Gloves protect your hands from cuts, splinters, and abrasions while providing extra grip when handling tools and materials.

Best Practices for Hand Protection:

  • Choose durable gloves that offer both protection and flexibility, allowing you to maintain dexterity while using tools.

  • Cut-resistant gloves are ideal for tasks that involve sharp blades or materials.

  • Always wear gloves when handling heavy or splinter-prone lumber, especially during framing or demolition work.

Recommended Product at Lowe’s:

5. Foot Protection: Steel-Toe Boots

Foot injuries are common on construction sites due to dropped materials, sharp objects, or heavy equipment. Steel-toe boots are crucial for protecting your feet from these hazards. They should be comfortable, durable, and provide excellent support for long hours on the job.

Best Practices for Foot Protection:

  • Always wear steel-toe boots when on a construction site, especially when handling heavy materials or working with large tools.

  • Opt for boots that are slip-resistant and provide good ankle support, reducing the risk of falls or sprains.

  • Keep boots in good condition; replace them if the soles wear down or if the steel toe becomes exposed.

Recommended Product at Lowe’s:

6. Respiratory Protection: Dust Masks or Respirators

When cutting wood, sanding, or working in enclosed spaces with dust and debris, it’s essential to wear respiratory protection. Dust masks or respirators help protect your lungs from inhaling harmful particles like sawdust, mold, or even chemicals in treated lumber.

Best Practices for Respiratory Protection:

  • Wear a dust mask when cutting, sawing, or sanding wood to protect yourself from inhaling fine particles.

  • For work involving treated wood or hazardous materials, opt for a respirator with a filter to prevent exposure to harmful fumes or chemicals.

  • Always check that your mask or respirator fits securely to ensure proper protection.

Recommended Product at Lowe’s:

  • 3M Sanding and Fiberglass Respirator
    This disposable respirator is excellent for protection against dust and particles common in rough carpentry. It’s lightweight, easy to use, and highly effective at filtering airborne debris.

Best Practices for Rough Carpentry on the Job Site

Along with wearing the proper PPE, following best practices on the job site is crucial for maintaining safety and efficiency. Here are a few key practices every rough carpenter should adopt:

1. Tool Maintenance and Inspection

  • Regularly inspect tools to ensure they are in good working condition. Dull blades, frayed cords, or loose parts can increase the risk of injury.

  • Keep tools sharp and clean to improve accuracy and reduce the force needed to complete tasks, minimizing strain and accidents.

2. Proper Lifting Techniques

Rough carpentry often involves lifting heavy materials like lumber, plywood, or beams. Improper lifting can lead to back injuries or strains.

  • Use your legs, not your back, when lifting heavy materials.

  • Ask for help when lifting materials that are too heavy or awkward to handle alone.

  • Utilize lifting aids, such as dollies or hoists, whenever possible.

3. Maintaining a Clean Job Site

A cluttered job site increases the likelihood of accidents. Keeping your workspace organized helps reduce tripping hazards and allows for easier movement.

  • Clean up debris and organize tools at the end of each workday.

  • Secure materials like lumber and scaffolding to prevent them from shifting or falling.

  • Ensure that pathways are clear, especially in high-traffic areas.

4. Communication and Awareness

Effective communication is essential on any job site. Being aware of your surroundings and alerting others to potential hazards helps everyone stay safe.

  • Use clear signals or verbal communication when working in teams, especially when handling heavy materials or using power tools.

  • Be aware of other workers around you, particularly when working at heights or near moving machinery.

  • Always follow safety protocols and don’t take shortcuts that could endanger yourself or others.

Learn Rough Carpentry Safely at Detroit Training Center

At Detroit Training Center (DTC), safety is at the heart of everything we teach. Our Home Renovation Workshops offer hands-on training in rough carpentry, ensuring you not only learn how to use the essential tools but also how to use them safely. Our expert instructors guide you through best practices for job site safety, giving you the confidence to work on any construction site.

Upcoming Workshops:

  • Basic Carpentry Workshop

  • Advanced Carpentry Workshop

Register today to learn the skills and safety protocols needed to excel in rough carpentry. Visit our website to sign up and take the first step toward a safe and successful career in the trades.

Conclusion

PPE is not just an optional add-on—it’s an essential part of staying safe on the job site. With the right gear, such as hard hats, safety glasses, work gloves, and steel-toe boots, you can significantly reduce the risk of injury while performing rough carpentry tasks. Combine this with best practices like tool maintenance, proper lifting, and job site organization, and you’ll create a safer, more efficient work environment. Whether you’re just starting or looking to brush up on your skills, Detroit Training Center’s Home Renovation Workshops will ensure you’re well-prepared for the job ahead.

How to Remove an Old Door and Replace It with a Prefabricated Door

External doors play a crucial role in your home’s security, energy efficiency, and overall appearance. If you're looking to upgrade to a new prefabricated door, you'll find plenty of options at major retailers like Lowe's. This article will guide you through the process of removing an old door and preparing for the installation of a new prefabricated one.

Why Choose a Prefabricated Door?

Prefabricated doors come pre-assembled, making them a convenient and cost-effective choice for home renovations. They typically include the door slab, hinges, and a frame, all in one unit. This makes the installation process faster and reduces the chance of errors. Prefab doors are available in various styles and materials at stores like Lowe's, from steel and fiberglass to wood.

Step-by-Step Process for Removing an Old Door

Tools You’ll Need:

  • Pry bar

  • Utility knife

  • Hammer

  • Screwdriver or drill

  • Tape measure

  • Level

1. Prepare the Area

Clear the area around the door, both inside and outside, to give yourself plenty of workspace. It’s a good idea to lay down a drop cloth to catch any debris during the removal process.

2. Remove the Door from Its Hinges

Start by opening the door fully and securing it to prevent movement. Using a hammer and a screwdriver or a hinge pin removal tool, tap the hinge pins up and out, starting from the bottom hinge and working your way up. With the pins removed, carefully lift the door slab out of the frame and set it aside.

3. Cut Through the Caulk and Paint

Using a utility knife, cut through any caulk or paint that is sealing the door frame to the wall. This step is essential to prevent damage to the surrounding walls when you remove the door frame.

4. Remove the Door Trim

Gently pry off the interior and exterior trim around the door frame using a pry bar. Be cautious to avoid damaging the wall or trim, especially if you plan to reuse the trim. Removing the trim exposes the mounting points that secure the frame to the wall.

5. Detach the Old Door Frame

Once the trim is off, locate the screws or nails securing the door frame to the wall studs. Use a drill or screwdriver to remove these fasteners. If the frame is also glued, you may need to use the pry bar to carefully pull the frame away from the wall. Work slowly to avoid damaging the surrounding wall.

6. Clear the Rough Opening

After the old frame is removed, inspect the rough opening for any damage or debris. Clean the area thoroughly and make any necessary repairs to ensure a smooth installation of the new prefab door.

Choosing the Right Prefabricated Door from Lowe’s

Lowe’s offers a variety of external doors, making it easy to find one that suits your home’s style and budget. Popular options include:

  • Steel Doors: Known for their durability and security, steel doors are often energy-efficient and can be painted to match your home’s exterior.

  • Fiberglass Doors: These doors are lightweight, low-maintenance, and available in various finishes that mimic wood grain, making them an attractive option for homeowners.

  • Wood Doors: For a classic look, wood doors are hard to beat. They provide excellent insulation but may require more upkeep to maintain their appearance.

Tips for Installing the New Prefab Door

  1. Measure Twice, Cut Once: Ensure the rough opening is the correct size for the new door. The opening should be slightly larger than the door frame to allow for adjustments.

  2. Use Shims: When setting the new door in place, use shims to make sure it's level and plumb. This step is crucial for proper operation and to prevent future issues.

  3. Secure the Frame: Once the door is positioned correctly, secure the frame to the studs with screws. Double-check that the door swings smoothly and that the gaps between the door and frame are even.

  4. Reinstall the Trim: After the door is securely in place, reinstall the interior and exterior trim. Use caulk to seal any gaps, enhancing both the appearance and energy efficiency.

Final Thoughts

Replacing an old door with a new prefabricated door is a great way to enhance your home’s curb appeal and functionality. With a wide selection of doors available at Lowe's, you can find a style that fits your needs and budget. By following these steps, you’ll ensure a smooth transition from your old door to a brand-new entryway.

For more tips and training on home renovation projects, consider signing up for a workshop at the Detroit Training Center!

Top 5 Must-Have Tools for Rough Carpenters | (DTC Article)

Rough carpentry is the backbone of construction, responsible for creating the framework and structure that will support everything else. Whether you're framing walls, building a deck, or putting up a roof, rough carpentry requires precision, strength, and—most importantly—the right tools. For both seasoned carpenters and beginners just starting out, having the correct tools is essential to doing the job efficiently and safely.

In this article, we’ll cover the Top 5 Must-Have Tools for Rough Carpenters and explain why each tool is essential. Plus, if you’re looking to expand your carpentry skills, Detroit Training Center’s Home Renovation Workshops can help you gain hands-on experience with these tools. We’ll also provide links to where you can find these tools at Lowe’s, one of the top suppliers of construction equipment.. This article is sponsored by our Lowe’s Storefront, packed with all the essentials for individual needs.

1. Hammer (Framing Hammer)

A hammer is perhaps the most iconic tool for any carpenter, but when it comes to rough carpentry, you need something heavier and more specialized—a framing hammer. Unlike a regular hammer, a framing hammer is longer, heavier, and often has a textured face to grip nails better.

Why It’s Essential:

  • Framing work requires a tool that can drive nails into wood with fewer swings, which a heavier hammer head provides.

  • The textured face reduces slipping, helping to sink nails more accurately and efficiently.

  • The longer handle gives you more leverage, making each swing more powerful, ideal for working with the dense lumber typically used in framing.

Recommended Product at Lowe’s:

2. Circular Saw

A circular saw is a must-have tool for any rough carpenter. It’s versatile, allowing you to make quick, straight cuts in wood, plywood, and even some metals. When you’re working on rough framing or cutting large pieces of lumber, a circular saw will save you time and effort.

Why It’s Essential:

  • A circular saw can make quick, accurate cuts through various materials, making it indispensable for framing and deck-building projects.

  • It allows for crosscuts, rip cuts, and even beveled cuts, providing flexibility during construction.

  • Its portability makes it ideal for jobsites where mobility and efficiency are critical.

Recommended Product at Lowe’s:

  • DEWALT 15-Amp 7-1/4-in Corded Circular Saw
    This DEWALT model offers the power and performance needed for heavy-duty cutting tasks. Plus, its cordless design adds extra convenience, especially when moving around a busy job site.

3. Tape Measure

A good tape measure is the cornerstone of any construction project, and rough carpentry is no exception. Accurate measurements are critical for ensuring that frames are built correctly and to code. A high-quality, durable tape measure helps you get precise measurements for every cut and installation.

Why It’s Essential:

  • Precision in measurements is key to rough carpentry. Even a slight miscalculation can throw off an entire project.

  • A tape measure allows you to quickly determine the length of lumber, distance between framing studs, and much more.

  • Many modern tape measures are built with extra durability, featuring coated blades that resist rust and wear, making them perfect for heavy-duty outdoor use.

Recommended Product at Lowe’s:

  • CRAFTSMAN HI-VIS 25-ft Tape Measure
    This Craftsman tape measure is known for its wide, durable blade and easy-to-read markings. The extra 25-foot length ensures you have plenty of tape for any framing or structural task.

4. Speed Square

A speed square (also known as a rafter square) is one of the most versatile tools for rough carpenters. This triangular tool is perfect for making quick measurements and ensuring that cuts and joints are perfectly square or angled.

Why It’s Essential:

  • Rough carpentry often involves framing walls and roofs, which requires accurate angles. A speed square allows you to quickly check and measure angles like 45° and 90°.

  • It can also function as a saw guide, ensuring that your cuts are straight and accurate when using tools like a circular saw.

  • Speed squares are also handy for marking cuts on lumber and can be used as a ruler for measuring short lengths.

Recommended Product at Lowe’s:

  • Swanson Tool Co Speed Square
    This classic aluminum speed square is durable, lightweight, and has etched measurements that won’t wear off, making it an indispensable tool for any rough carpenter.

5. Power Drill (Cordless)

A cordless power drill is a necessity for anyone working in construction, particularly rough carpenters. From drilling pilot holes to driving screws into lumber, a high-quality power drill will make your job easier and faster.

Why It’s Essential:

  • Cordless drills are critical for driving screws and bolts into thick framing materials like studs and joists, which is a frequent task in rough carpentry.

  • The cordless nature allows for maximum mobility, letting you work freely across large job sites without worrying about cords getting tangled.

  • Many drills also come with adjustable torque settings, ensuring you can use the right amount of force for each task, preventing overdriving or stripping screws.

Recommended Product at Lowe’s:

Master Rough Carpentry Skills at Detroit Training Center

These five tools are crucial for any rough carpenter, whether you’re a beginner or experienced in the trade. However, it’s not just about having the tools—it’s about knowing how to use them effectively.

At Detroit Training Center (DTC), we offer comprehensive Home Renovation Workshops that teach you how to use these essential tools in real-world construction scenarios. Whether you’re interested in framing, carpentry, or general home renovation, our hands-on classes provide the experience and instruction you need to become proficient in rough carpentry.

Upcoming Workshops:

  • Basic Carpentry Workshop – This beginner workshop covers the basics of carpentry, including tool usage, framing techniques, and more.

  • Advanced Carpentry Workshop – For those with experience, this workshop delves deeper into complex framing projects and advanced tool techniques.

Both workshops will give you practical, hands-on experience using tools like those mentioned above, and our expert instructors will guide you through every step of the process. Plus, these skills can open doors to entrepreneurial opportunities, allowing you to start your own home renovation or contracting business.

Conclusion

Having the right tools is essential for any rough carpenter, but it’s also important to know how to use them properly. Investing in high-quality tools like a framing hammer, circular saw, tape measure, speed square, and cordless drill will help you succeed in your carpentry projects. And if you want to build on these skills, Detroit Training Center’s Home Renovation Workshops are a great way to get hands-on training in a supportive environment.

Don’t miss your chance to learn from the best! Sign up for our Basic or Advanced Carpentry Workshops and take the first step toward mastering rough carpentry—and maybe even starting your own business.

Visit our website to register today!

Drywall Basics: Essential Tools and Materials for Beginners | (DTC Article)

When starting your journey into drywall hanging and taping, having the right tools and materials is crucial. This guide will cover the essentials you need to ensure your project goes smoothly and looks professional.

Essential Tools for Drywall Hanging

  1. Utility Knife: A sharp utility knife is indispensable for scoring and cutting drywall sheets to the desired size. Keep extra blades on hand to maintain precision.

  2. T-Square or Drywall Square: These tools help measure and mark straight lines accurately on drywall sheets, ensuring even cuts and reducing waste.

  3. Drywall Saw: For cutting openings for electrical outlets, light switches, or other fixtures, a drywall saw is your go-to tool. It allows for precise, detailed cuts.

  4. Screw Gun or Drill: A screw gun or drill with a drywall bit attachment is necessary to drive screws into the drywall without damaging the surface. This tool speeds up the hanging process significantly.

  5. Drywall Lifter: This tool assists in lifting and holding drywall panels in place, especially when working on ceilings, making the installation much easier and safer.

Key Materials for Drywall Projects

  1. Drywall Sheets: The most common type is ½-inch thick gypsum board, which works well for most interior walls. For ceilings or fire-resistant areas, consider thicker or specialized sheets.

  2. Drywall Screws: Use coarse-thread screws for wood studs and fine-thread screws for metal studs. The length of the screws will depend on the thickness of the drywall.

  3. Joint Tape: Joint tape covers seams between drywall sheets. You can choose between paper tape and fiberglass mesh tape, with each offering different benefits in terms of strength and flexibility.

  4. Joint Compound (Mud): Used to fill and smooth over joints, screws, and imperfections, joint compound is essential for achieving a seamless finish. There are different types, including all-purpose, lightweight, and quick-setting compounds.

  5. Sandpaper or Sanding Sponge: Sanding is necessary to smooth out the joint compound after it dries. Use a fine-grit sandpaper or sponge for the best results without damaging the surface.

Upcoming Workshop at Detroit Training Center

If you're interested in learning these skills hands-on, the Detroit Training Center is offering a Drywall Hanging and Taping Workshop on October 12th. The workshop runs in two sessions: 9:30 am - 12:30 pm and 1:30 pm - 4:30 pm. It's a great opportunity to get professional guidance and practical experience.

Pricing options for the workshop:

  • $70 for a single session

  • $120 for two sessions

  • $300 for six sessions

  • $575 for twelve sessions

To register or for more details, visit the Detroit Training Center website or call (313) 221-5876. Don’t miss this chance to expand your skills in drywall installation!

The Impact of Economic Cycles on Trade Jobs in Michigan | DTC Article

Michigan’s economy has long been tied to industries that rely heavily on skilled trades, from manufacturing and construction to automotive and energy. As the state navigates periods of economic booms and downturns, the stability of trade jobs is directly impacted. Analyzing how recessions and economic growth affect job availability, wages, and opportunities in the trades can provide valuable insights for workers and industry leaders alike. At Detroit Training Center, this understanding helps shape the preparation and training of tradespeople to withstand the ebb and flow of economic cycles.

Economic Booms and Trade Job Growth

During periods of economic growth, trade jobs in Michigan often experience a surge in demand. The automotive sector, a key player in Michigan’s economy, drives much of this demand. When consumer spending increases, automakers ramp up production, which in turn creates a need for skilled labor such as machinists, welders, electricians, and HVAC technicians. Additionally, Michigan’s construction industry tends to thrive during economic booms as commercial and residential building projects rise to meet increased demand for housing, infrastructure, and business development.

During these times, skilled workers often find job stability, higher wages, and more opportunities for overtime or contract work. Companies are more willing to invest in hiring and training new workers, which benefits institutions like Detroit Training Center, as more individuals seek to enter the trades or enhance their skills to meet the growing demand. In boom periods, skilled workers can also negotiate better benefits and job security due to the higher competition for labor.

Recessions and the Decline in Trade Jobs

Conversely, when economic downturns or recessions hit, Michigan's trade jobs are often among the first to feel the effects. The state’s economy, particularly in Detroit, is highly sensitive to fluctuations in manufacturing and construction, industries that tend to slow significantly when consumer confidence and spending decline.

During recessions, companies in industries like automotive and construction often delay or cancel projects, leading to a sharp decrease in job openings for tradespeople. Layoffs are common, and workers who remain employed may face reduced hours, lower wages, or the loss of benefits. In the construction sector, for example, fewer new homes and commercial buildings are erected during economic slowdowns, which directly affects the demand for carpenters, electricians, plumbers, and other skilled laborers. The manufacturing sector may see a reduction in orders for machinery or automotive components, causing plant closures or scaled-back production.

For trade workers, job stability becomes precarious during recessions, particularly for those who rely on seasonal or contract work. Despite the skills that make them employable, a shrinking economy can result in fewer job openings, longer periods of unemployment, or a shift to lower-paying positions.

Cyclical Resilience and Adaptability

Though economic cycles can significantly impact job stability in the trades, resilience and adaptability are key to weathering downturns. Skilled tradespeople in Michigan who invest in continuous learning and diversify their skill sets are better positioned to find opportunities even during challenging times. Training centers, like Detroit Training Center, play a vital role in preparing the workforce for these cyclical fluctuations by offering a wide range of programs that allow workers to stay relevant in their fields or pivot to adjacent trades.

For instance, during recessions, some tradespeople may transition from automotive manufacturing to building maintenance, home renovation, or energy-efficient retrofitting, which often see increased demand during economic downturns due to cost-saving measures. By having a diverse skill set, workers can better adapt to shifting market conditions.

Michigan’s Economic Future and the Role of Training

Michigan’s economy is expected to continue evolving, particularly with the rise of technology, renewable energy, and infrastructure development. Skilled trades will remain essential, and demand for these jobs will continue to be influenced by economic cycles. However, with the right training and strategic preparation, tradespeople can navigate both the highs and lows of Michigan’s economic shifts.

Organizations like Detroit Training Center help workers build resilience by providing up-to-date training that prepares them for emerging fields, such as green energy and smart technology systems. As Michigan’s economy diversifies beyond traditional industries, workers with versatile skills in carpentry, electrical systems, and HVAC will be crucial in supporting both the growth and recovery phases of economic cycles.

Conclusion

Economic cycles have always played a significant role in determining the stability of trade jobs in Michigan. While recessions can reduce opportunities, booms present significant growth potential. For workers in Michigan, staying informed, adaptable, and continuously honing their skills is key to maintaining job security. With organizations like Detroit Training Center offering specialized training and development, Michigan’s tradespeople can better prepare for the future, ensuring long-term career success regardless of the economic climate.

Share